


The Ultimate Guide To Growing Heirloom Tomatoes
From our favorite heirloom varieties to seed starting to harvesting, we share our best tips for growing heirloom tomatoes in your vegetable garden. This comprehensive guide covers all the steps to grow tasty heirloom tomatoes right in your backyard garden!
Disclosure: This post contains affiliate links, which means if you make a purchase through these links, we may receive a small commission at no extra cost to you.
After being spoiled every summer by the incredible flavor, juiciness and velvety texture of fresh garden tomatoes, I can’t bear to buy the bland, tasteless ones in the grocery store. I spend all winter craving our summer tomatoes.
Luckily, Jeremy is our in-house tomato expert, and he grows the most flavorful and delicious tomatoes I’ve ever tasted. All of the tomato wisdom in this post comes from his testing, tweaking, researching and growing over 60 heirloom tomato varieties over the years.
Selecting Tomato Varieties
Two factors to consider when choosing tomato varieties are whether you want to grow determinant or indeterminant plants and days to maturity.
Determinate plants are more compact, and produce fruit during a narrow time window.
Indeterminant plants get much larger, and produce fruit continuously throughout the growing season. We only grow indeterminant varieties because almost all heirlooms are indeterminants.
With our short growing season in Colorado, we always take days to maturity (DTM) into consideration when selecting tomato varieties. It’s hard for us to grow tomatoes with long growing seasons (such as those with DTM over 80 days). We do as much as we can to extend the season with Wall O’ Waters and hoop tunnels, but days to maturity is super important for us when selecting varieties.
All the days spent growing tomatoes indoors don’t count toward days to maturity—the clock doesn’t start ticking until you transplant to the garden. There are a number of factors that influence DTM and these values are really more a ballpark. While it might be tempting to select only early varieties in order to have a long harvest season, the super early varieties (~65 days or less) typically lack the flavor and/or size of later maturing varieties.
Buying Starts Versus Starting Seeds
Buying Starts
- PRO less work involved
- CON limited varieties, expensive, older plants get transplant shock
TO PURCHASE: local or online at Laurel’s Heirloom Tomato Plants
Grow from seeds
- PRO lots of varieties to choose from, inexpensive
- CON more work involved
TO PURCHASE: Many garden seed sources will have a good selection of tomatoes, but if you want even more variety we’ve listed several sources that either specialize in tomatoes or carry an unusually large selection.
Our Favorite Heirloom Tomatoes
At Umbel Organics, we’ve trialed over 60 different tomato varieties (mostly heirloom) over the years. When choosing what tomatoes to grow, we consider flavor profiles and productivity as well as disease resistance. Below are 10 of our favorites. These varieties have proven exceptional, giving us loads of fruit with top notch flavor year after year. Given our relatively short growing season, most of these are mid-season tomatoes (80 DTM or less).
- Cherokee Purple (heirloom; purple): Amazing, complex flavor makes this heirloom tomato a favorite of many home gardeners. It is also one of the most productive heirlooms in our garden, producing loads of medium-sized tomatoes starting early in the season. The combination of flavor and productivity puts it at the top of our list. A must grow!
- Paul Robeson (heirloom; black): This is Susie’s favorite tomato. Complex flavor profile typical of black tomatoes but with a little extra zing. Rivals any tomato we have tried in the flavor department. It is an average producer of medium size tomatoes in our garden, but that is more than made up for by the delicious flavor.
- Stump of the World (heirloom; pink): This potato-leaf variety produces sweet, but complex tasting medium sized tomatoes. One of the most productive heirlooms in our garden.
- Black Tom (heirloom; black): This is a rare, relatively unknown black tomato that I purchased on a whim from Marianna’s Heirloom Seeds. What a find! The flesh is burnt orange/brown, but the inside is absolutely beautiful mix of deep red/purple. The flavor is sweet—not as complex as Cherokee Purple or Paul Robeson. But, this variety is a workhorse in the productivity department, being one of the first to start producing and continuing over the entire season.
- Mortgage Lifter (heirloom; pink): This popular heirloom reminds me of tomatoes I grew up eating as a kid in West Virginia. And it may just be, since this variety originated in my home state. Rich flavor with the perfect amount of tang, this is what a lot of people consider to be “classic” tomato flavor. The plants produce a little more than the average heirloom in our garden, and some of the fruits can be quite large (nearly a pound).
- Black Prince (heirloom; black): Black tomatoes are sometimes described as having a rich, smoky flavor, which hits the nail on the head for this variety. Fruits are smaller than the other varieties listed, but you get a lot of them. Starts producing very early in the season here in Colorado.
- Aunt Ginny’s Purple (heirloom; pink): The flavor of this potato-leaf variety is very good, but what gives it the edge over a number of similarly flavored heirlooms is that it starts producing very early, which is relatively rare for a large-sized beefsteak tomato.
- Black Cherry (heirloom; black; cherry): This cherry tomato produces good quantities of large cherry tomatoes that burst in your mouth with rich, complex flavors often associated with black tomatoes. Yields are average, but more than made up for by the flavor.

Starting Tomatoes From Seed
Our detailed post on How To Start Vegetable Seeds Indoors walks you through the steps on starting tomatoes from seed. Once you have all the equipment (e.g. lights and a shelving system), starting your tomato plants indoors is easy, inexpensive, and rewarding.
When To Start
- Tomatoes should be started indoors 6-8 weeks prior to your intended outdoor planting date. Tomatoes cannot tolerate even a light frost so unless you are using our season extension methods, you should plant get your plants into the ground after the average last frost date in your area when soil temperatures are at least 60 degrees.
Germinating Seeds
- Learn more about the steps involved in germinating seeds here. If kept between 75-85 degrees, most of our tomato seeds germinate in 5-8 days. If the temperature is colder, it will take longer.
Repot Your Seedlings
- Once the tomato seedlings emerge, you’ve still got several weeks before they’re ready for the garden. Limiting the root system can stunt plant growth, so transplanting the seedlings to bigger pots (“potting-up”) gives the roots more room to spread.
- How do you know when to pot-up? Once your plants have two sets of true leaves (not counting the cotyledons) they are ready to be re-potted into larger containers. You can find more detail about repotting vegetable seedlings here. Jeremy also goes through the process of potting up and hardening off tomato seedlings in the video below:
Harden Off Your Plants
- Tomato plants grown indoors take some time to adjust to the harsh sun, wind, and temperature swings in your garden.
- About a week prior to planting time, start acclimating your plants to the outdoors by setting them outside each day. We leave them out in a partially shaded spot for an hour or two on the first day, increasing the sun exposure and the amount of time the plants are left outside each day. Work up to leaving them out for the entire day and overnight.
- While this process would ideally be carried out over the course of at least a week, we have often done it over 3-4 days without ill effects. Don’t expose the plants to too much sun on the first day or two—in the intense Colorado sun we have severely damaged forgotten plants while attempting to harden them off. Also, be aware that the soil will dry out quickly in small pots, so you may have to water multiple times a day. Since this is a stressful time for plants, we give them some liquid organic fertilizer during the hardening off period as well.
Planting Tomatoes Outside
Unless you are providing protection for your tomato plants (see our tomato season extending post), you don’t want to plant in the garden until after the average last frost date in your area. Tomato plants will not survive frost without protection! The image below shows our garden after a late May snowstorm. The tomato plants are protected with Wall O’ Waters, then covered with hoop tunnels and greenhouse clear plastic film. Our tomato plants were nice and snug and weathered the storm without a worry!

Plant Spacing
Overcrowded tomato plants can reduce plant yield and create conditions for diseases to run rampant in your garden. The decision of how closely you space your plants depends on a few factors. Are you growing determinate or indeterminate varieties?
For determinate plants you can get away with closer spacing because these plants will not grow nearly as large as indeterminate plants. We recommend spacing determinate plants 18” apart.
For indeterminate plants you have some more decisions to make. Most importantly, you have to decide whether you are going to prune your plants (see below for a full discussion of pruning). If you are not going to prune your plants, space them at least 28 inches apart. If you are planning to prune to only a few main stems, you can get away with closer spacing (22-24 inches).
Steps For Transplanting Tomatoes In The Garden
- Water the plants with an organic liquid fertilizer solution derived from fish meal or kelp until the soil is moist but not completely saturated. Moist soil helps firm up the root ball so it doesn’t fall apart when you pull the plant out of the pot. If the soil is too wet, the root ball may fall apart when you pull out your plant.
- Remove all lateral branches leaving only the top set of leaves. This is a really important step because it will allow you to bury the stem. More on that later. You should be able to easily remove the branches by pinching them between your fingers at the point of attachment to the main stem.
- Dig a trench that is large enough that you will be able to lay the plant on its side in the planting hole. Amend the planting soil by adding a handful of compost, and some granular organic tomato fertilizer. Mix into the soil. You can use any granular organic fertilizer, but I prefer to use one specifically formulated for tomatoes (see section on fertilizing below). Find organic soil, compost and fertilizer recommendations here.
- Place your hand over the top of the pot and turn it upside down. The stem should be cradled by your fingers so you can catch the plant. You may need to squeeze the sides of the pot and twist. The plant should come out cleanly with the root ball intact.
- Lay the plant on its side in the trench and cover the stem with soil. You can curve the top leaves upward and tamp down the soil, but don’t worry too much about it. Plants sense gravity and it will know which way to grow. New roots will sprout from the hairs on the stem, eventually providing a strong root system for your plant. This really works. At the end of the year when I pull out my plants I am always amazed by the extent of the root system sprouting from the buried stem. You can also just bury the stem deeply rather than laying the plant on its side. The soil will be cooler the deeper you go, which can slow down growth in cooler climates.
- Water deeply and firm up the soil.
- Depending on how you are planning to support your plants (see below), you might want to place the supports in the ground before the roots spread so you don’t damage them later.
Caring For Your Tomato Plants Throughout The Season
Mulch
We have found one of the most important things you can do to keep your tomato plants happy is to add mulch. Mulch does so many things:
- moderates soil temperature
- keeps soil evenly moist (very important for tomatoes)
- reduces the need for manual watering
- suppresses weed growth
- adds nutrients back to the soil as it decomposes.
There are lots of organic materials you can use for mulch, but we prefer straw. You can purchase straw bales inexpensively at feed stores or garden centers. Make sure you get straw rather than hay, because hay is bundled with seed heads intact and you will be doing a lot of weeding in the future. If you can’t get straw, other options include shredded leaves, grass clippings or pine needles. Avoid using wood-based mulches because when the wood mixes into the soil over time it can tie up nitrogen, making this important element less available to your plants.
The timing of mulch application is important. Here in Colorado it takes a while for the soil to warm up, so we don’t mulch until a few weeks after planting. If you live in a warmer climate, you might want to mulch right when you plant your tomatoes. When it’s time, add mulch about 3 inches deep around your plants.
Pruning
As tomatoes grow, they produce new stems, often referred to as “suckers”, from the point at which a lateral branch meets the main stem (at about a 45 degree angle). These suckers will grow into another main stem, eventually producing more fruit and more suckers. Pruning your tomato plant means that you remove some or all of these suckers as they appear.
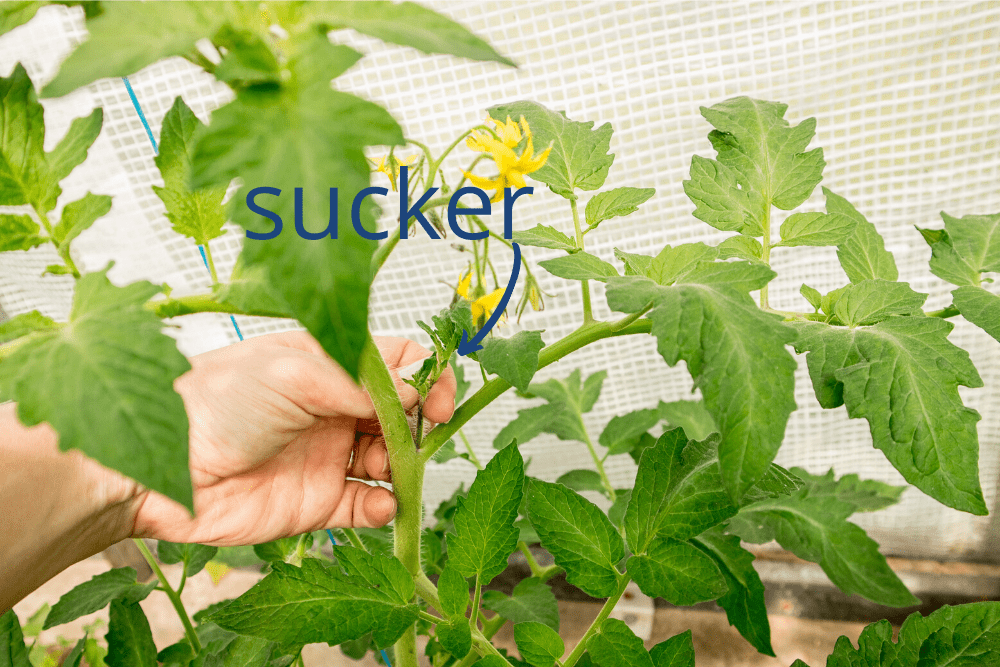
The debate about pruning applies to indeterminate tomato plants—Do Not prune determinate varieties. In its most extreme form, some gardeners prune all of the suckers on an indeterminate plant so that the plant growth is limited to one stem, while less aggressive pruning might result in 3-5 stems (or even more). Some growers prefer not to prune at all.
Benefits of pruning: fruit may ripen earlier, fruit size may be larger, reduces spread of foliar diseases, can plant with closer spacing
Drawbacks to pruning: pruned plants produce less fruit over the growing season, labor intensive, plants grow taller, limited capacity to make up for blossoms that drop during high heat or other adverse weather conditions, sun scald
The question of whether to prune has been long debated by tomato aficionados and gardeners tend to be entrenched in one camp or the other. The truth is, there is no correct answer, and a lot depends on the length of your growing season and your goals (e.g. do you want the largest fruit possible, or more, smaller fruits?).
At Umbel Organics we have developed a strategy that blends the benefits of each method in order to maximize yields while keeping plants manageable and healthy. We always let the suckers produced early in the season grow in order to increase yields. Knowing that it takes anywhere from 6-8 weeks to go from flower to ripe fruit, in late July we begin pruning new suckers aggressively so the plant will concentrate on ripening existing fruit by early October, when the weather is still agreeable (your target date may differ depending on your climate).
Any suckers produced after this time are unlikely to yield high quality fruit due to cool autumn nights and early frosts, so we are not really sacrificing production. In early September, we “top” plants, which means pinching off the growing tips of all the main stems so the plant will not get any taller. This will allow the plant to focus on ripening existing fruit.
Pruning How-To
Pruning is quick and easy and doesn’t require any special tools, just your fingers. Try to prune suckers before they grow larger than 4 inches—you can prune larger suckers but it might cause the plant a little bit more stress. At the point where the sucker meets the stem, grab it between your fingers and pinch it off. It should snap off quite easily. When the plant is putting on a lot of new growth, just make sure to check for suckers at least every other day because they will grow rapidly.
One Pruning Strategy All Gardeners Should Practice
As the season unfolds, periodically remove the lowest hanging lateral branches from your plants to allow for more air circulation. These lower branches are a major risk for disease. Many of the most common tomato diseases, like early blight, result from water splashing up from the soil and spreading spores onto foliage.
Supporting Your Tomato Plants
We recommend giving your tomato plants some support by implementing the staking, caging or weaving method. A supported tomato plant is less susceptible to mold, critter bites, and foliar pathogens like early blight. There are many ways to provide support, and the method you choose depends on your pruning strategy.
Staking
- If you prune to 1-3 stems, then the easiest training method is to place one or more stakes in the ground near the plant and periodically tie the stems to the stake. We use jute twine, which is gentle enough on the plants to prevent damage to the stems. Stakes must be at least 6 feet tall for indeterminate plants. We use inexpensive furring strips, and use a jig saw to create a point at the end so they can easily be hammered into the soil. You can also use bamboo, plastic, or metal tomato stakes or T-posts.
Caging
- Less aggressive pruners often choose to use tomato cages, which contain and support the multitude of stems produced by an unpruned plant. Unfortunately, if you are growing indeterminates, you are probably going to have to make your own custom tomato cages. The ones you see at the store just aren’t big enough, unless you are growing determinate varieties. Remember that an unpruned indeterminate tomato plant will easily grow 5 feet tall or more. Learn how to build your own tomato cage here.
Weaving
- If you don’t want to shell out the cash or deal with the labor involved with making your own tomato cages, try the Florida Weave method for trellising tomatoes. Space tall stakes (we use 6 ft T-posts) at the end of each row of plants and between every 2-3 plants down the row. When plants are tall enough to need support start by tying jute twine around a stake at one end. Weave the twine around the first plant, then around the next plant, around the next stake, and so on until you get to the end of the row. Make sure to keep the twine taught so it will support the plants. As the plants grow throughout the season you just continue to run additional twine at higher levels. The image below shows our tomato plants using a modified version of the Florida Weave as well as pvc piping and row covers for insect and hail protection.

Watering Tomato Plants
The biggest key to watering tomatoes is to make sure you do it regularly so the soil stays evenly moist. Erratic watering causes all kinds of problems with tomatoes. The Eley Drinking Safe Water Hose is our favorite for a drinking safe garden hose, and you can more more non-toxic hose options here.
Blossom end rot occurs when plants experience wide fluctuations in soil moisture, like going from very wet to dry during fruit set. The plants ability to move calcium to fruits is impaired and you get blossom end rot.
Cracked Fruit- Although this problem is mostly cosmetic, cracks can provide a route of entry for mold or other pathogens. Cracking typically occurs when you have a sudden major influx of moisture as fruit is ripening, especially if it has been dry in the period before. Excess water is sent to fruits and can essentially cause the tomato to burst, hence the crack.
- Rule 1: Keep the watering consistent so the plant doesn’t experience wide fluctuations in moisture. This doesn’t mean that you have to water every day. Just water deeply so the soil is moist to about 6 inches a few times a week depending on your gardening environment. You can check by sticking your finger a few inches in the soil. The very top layer of soil can dry out between waterings, but make sure the soil stays consistently moist a few inches down. If plants are showing visible signs of water stress, like wilting, you need to water more often. Mulch—one of the main benefits of mulching is that it helps keep moisture levels consistent, which greatly reduces problems with blossom end rot and fruit cracking.
- Rule 2: Avoid spraying foliage whenever possible. Wet foliage invites diseases to spread in your garden. Keep the foliage dry by directing the water to the base of the plant.
Fertilizing Tomato Plants
If you have good healthy soil and use slow-release organic fertilizers, you will only need to fertilize tomatoes a few times throughout the season. Avoid giving tomato plants too much nitrogen—you might end up with vines that run rampant in your garden but set very little fruit. Find organic soil, compost and fertilizer recommendations here.
We use an organic fertilizer at planting time, followed by organic liquid fertilizer when plants are established. We use fertilizers specifically formulated for tomatoes since they usually have extra calcium, which, in conjunction with good watering practices, helps prevent blossom end rot. They’re also fairly high in phosphorous and potassium to promote flowering and fruit production.
After fertilizing at planting time, don’t fertilize again until the first blossoms appear. When blossoms appear, use an organic liquid fertilizer. In a few weeks when the plant has set a considerable number of fruit, give plants another dose of organic liquid fertilizer.
Tomato Plant Diseases & Pests
There are many diseases and pests that can wreak havoc on tomato plants. The prevalence depends on where you live, and the best resource by location is to check with your local university extension. We use the Colorado State University Extension, and you can do an online search to find your state extension, or look it up by your zipcode here. Another option is the Vegetable MD online from Cornell University. We’ve found that row covers work well to protect tomato plants from pests in Colorado, and you can read more about how we use row covers here.
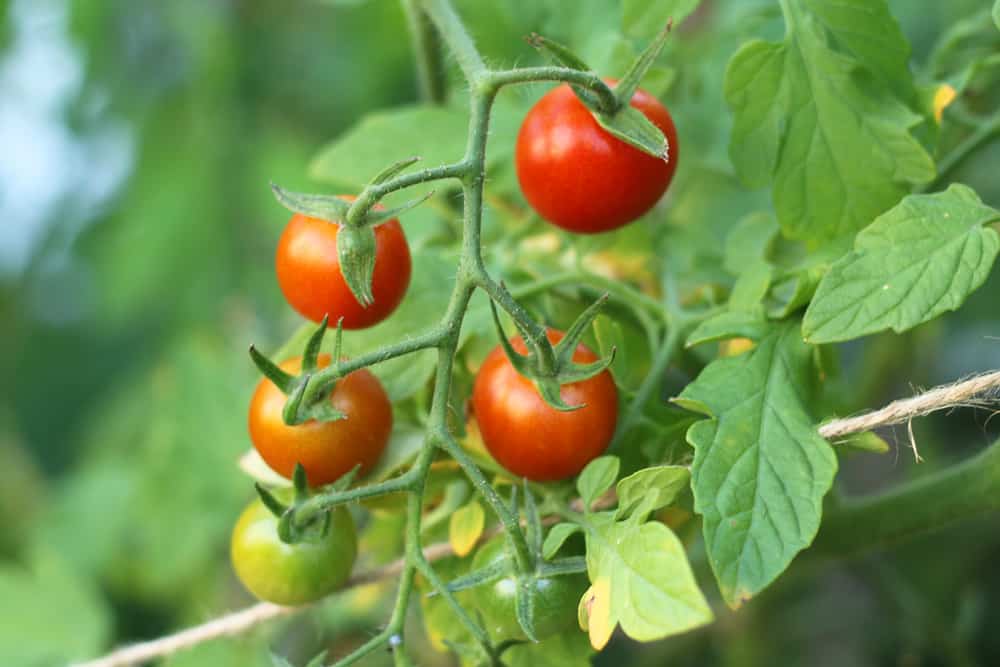
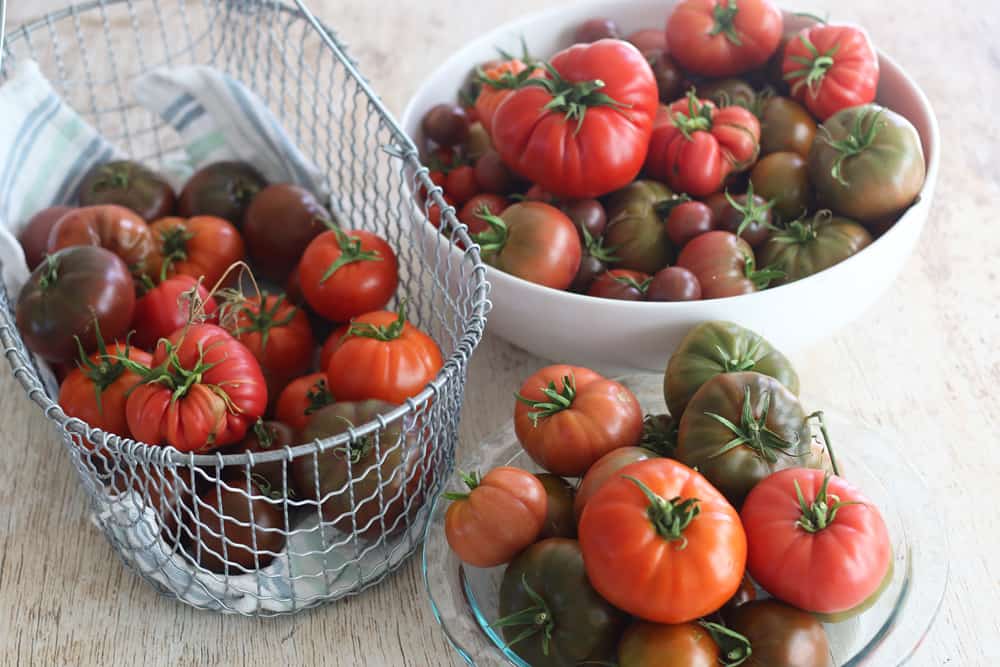
Harvesting Heirloom Tomatoes
We get such a bonanza of cherry tomatoes out in the garden that we literally eat them straight off the vine. But for the bigger heirlooms, we have a different approach.
Like many gardeners, we once bought into the myth of the vine ripened tomato. When we first started growing tomatoes, we used to leave fruit on the vine and pick at the peak of ripeness. Through research and experimentation over the years, we’ve learned that picking tomatoes before they are fully ripe (letting them ripen inside) does not adversely affect flavor.
There are many risks involved with leaving tomatoes on the vine until fully ripe, including:
- splitting/cracking
- sun scald on exposed fruit
- cold or hot weather
- insect attacks
- thievery
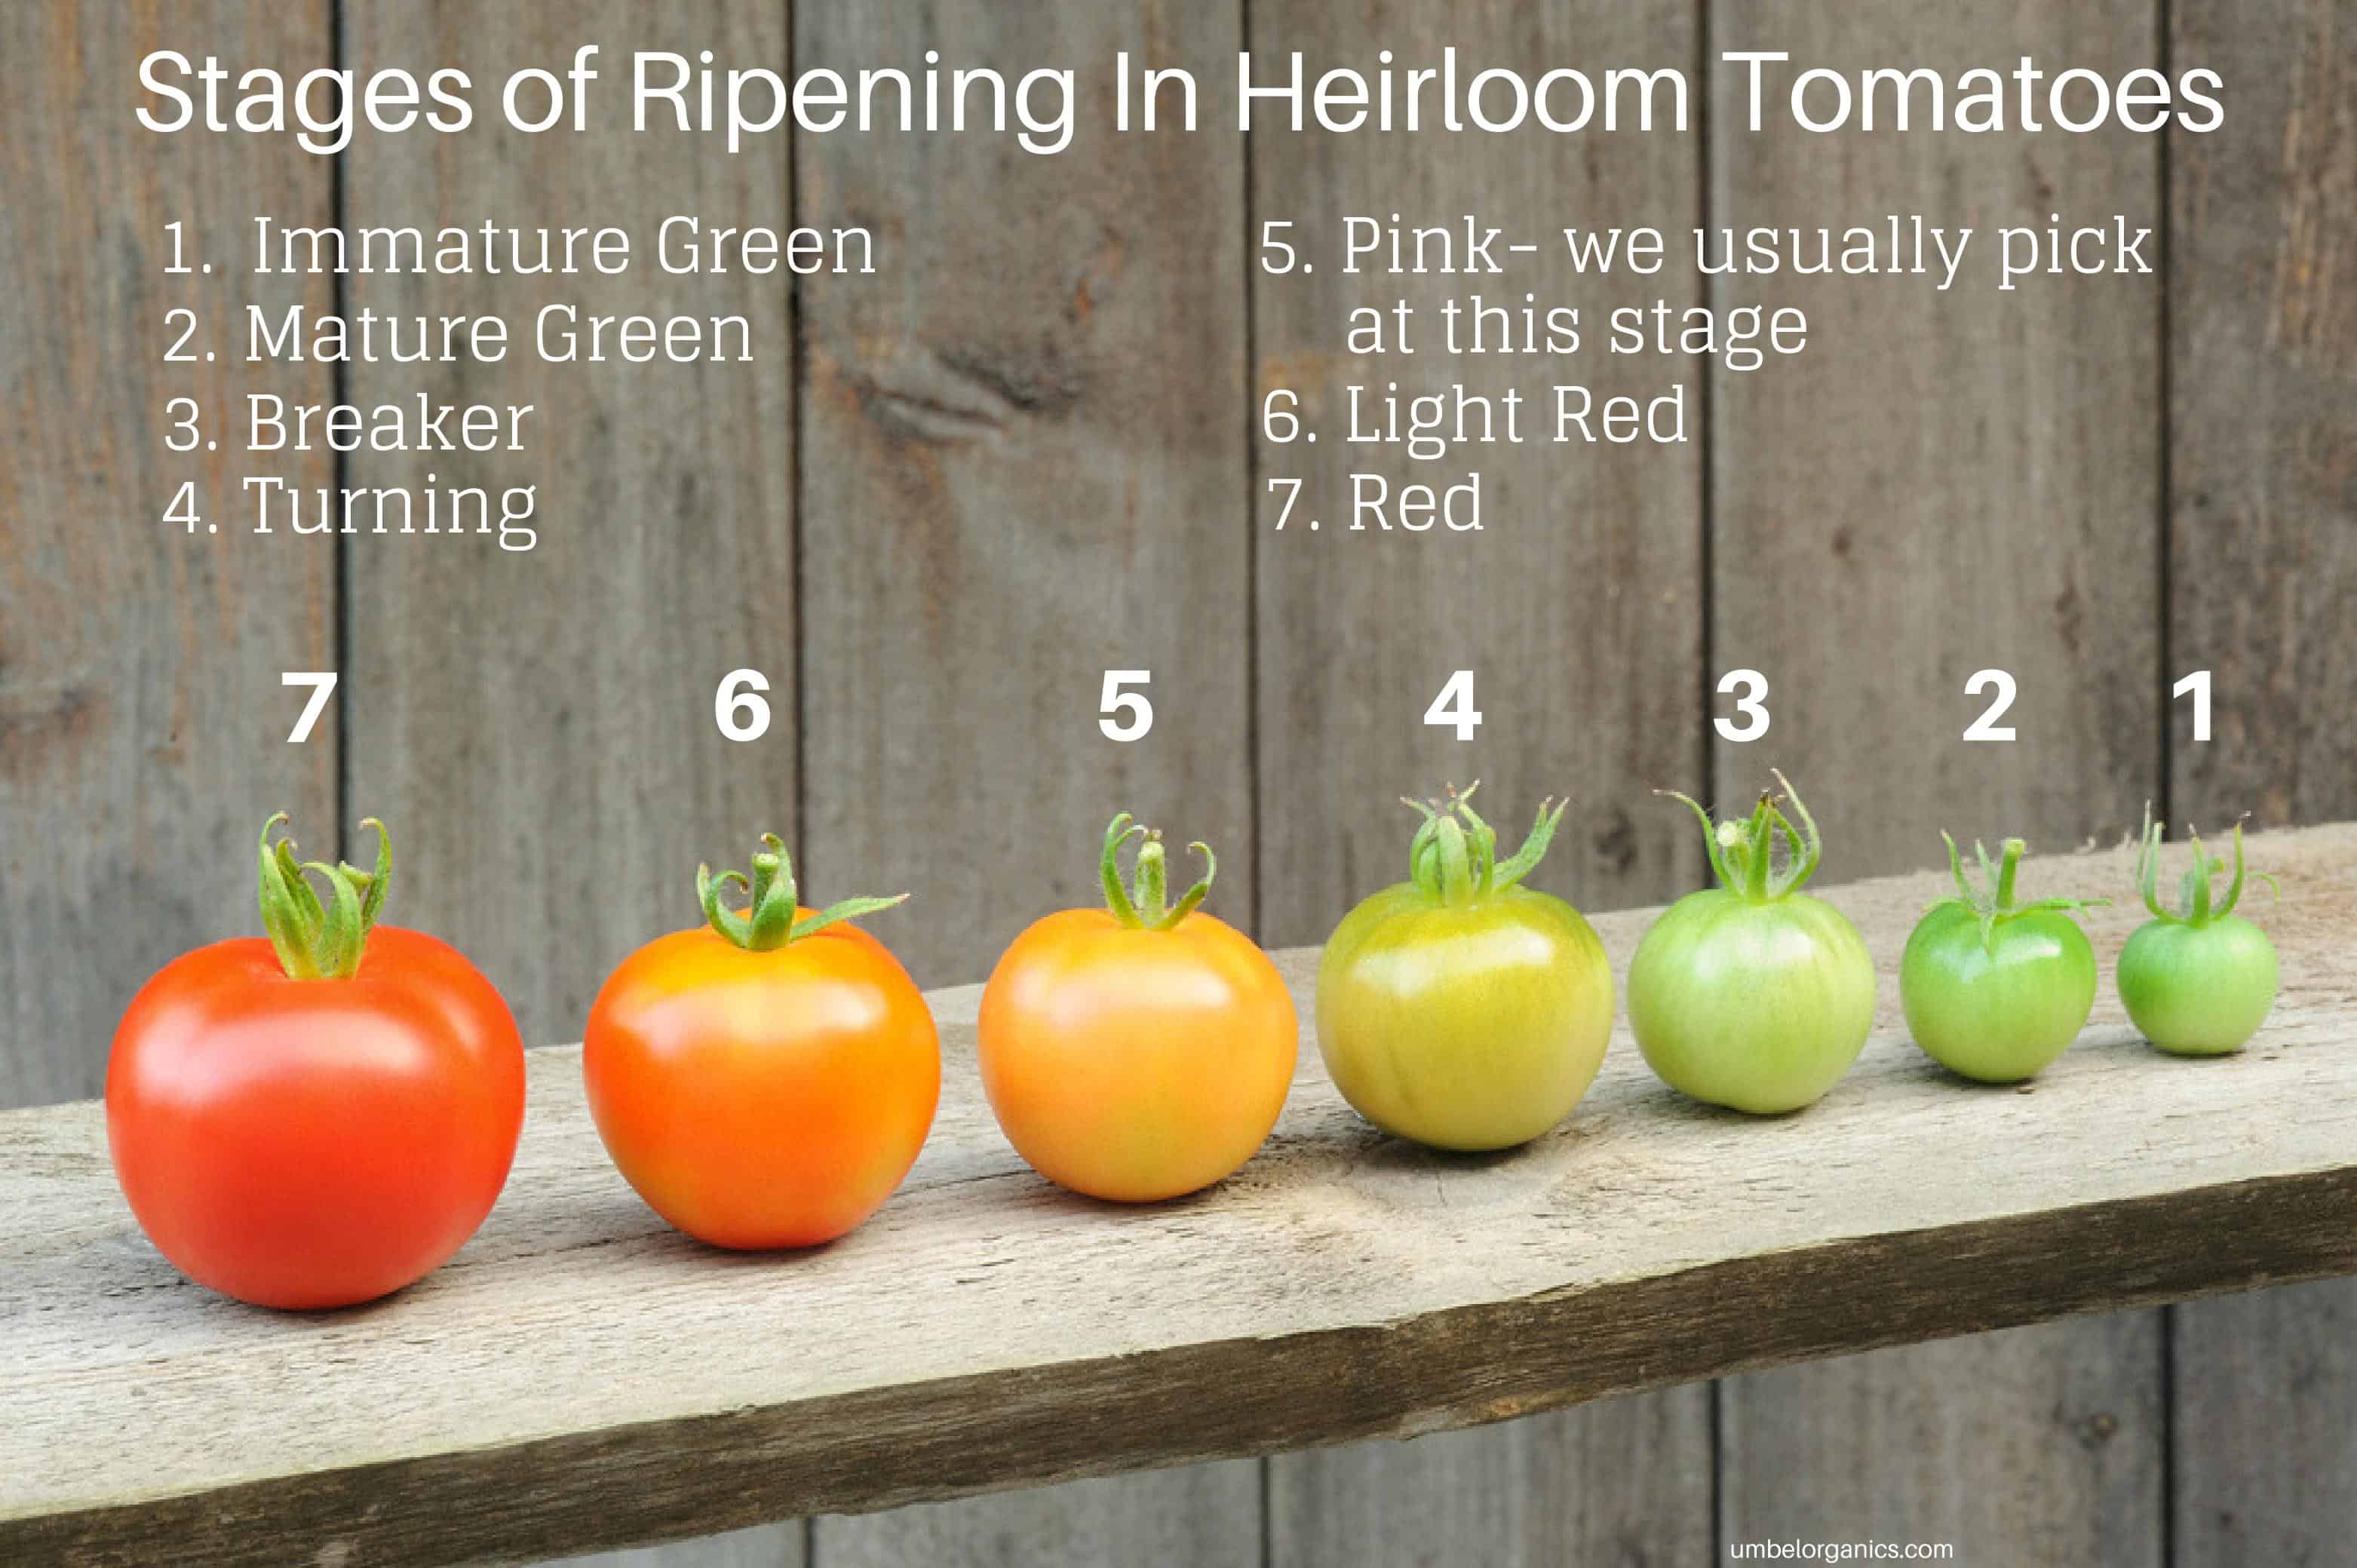
We harvest most of our heirloom tomatoes during the “pink” stage, letting the tomatoes fully ripen indoors after picking. We have a post on WHEN TO HARVEST HEIRLOOM TOMATOES with more detail about why we harvest heirloom tomatoes at this stage. For us, there is no perceptible effect on flavor or fruit quality with this method.
In all of our side-by-side taste comparisons, we can’t detect a difference in taste between vine-ripened tomatoes and those harvested at the pink stage and left to ripen inside after picking.
How To Store Heirloom Tomatoes
DO NOT store them in the refrigerator! We store the unripened tomatoes in a large, shallow ceramic dish in the kitchen. The dish sits on a table that’s not in direct sunlight. It’s fine to keep them on your kitchen counter as long as the room temperature stays between 65-75°F.
AVOID placing unripened tomatoes in direct sunlight. They do not need light to ripen. High temperatures can inhibit ripening.
How to tell when your heirloom tomatoes are ripe? A ripe tomato will give slightly to the touch. Be careful not to press too firmly. Use a very light squeeze with your fingers, and the outside of the tomato should give a little.
Shop Heirloom Tomato Growing Essentials


More Gardening Inspiration
second, fourth and seventh image image via depositphotos